Welcome to DesignBuilder’s March Newsletter! In this edition we bring you:
- Introducing Report Filtering in Results Viewer v4.2
- Win a Complimentary Pass for SimBuild in Denver this May!
- Modelling Guidance for Various Project Stages
- Try it Out: Creating More Complex Geometry in DesignBuilder
- Learning Resources
Introducing Report Filtering in Results Viewer v4.2
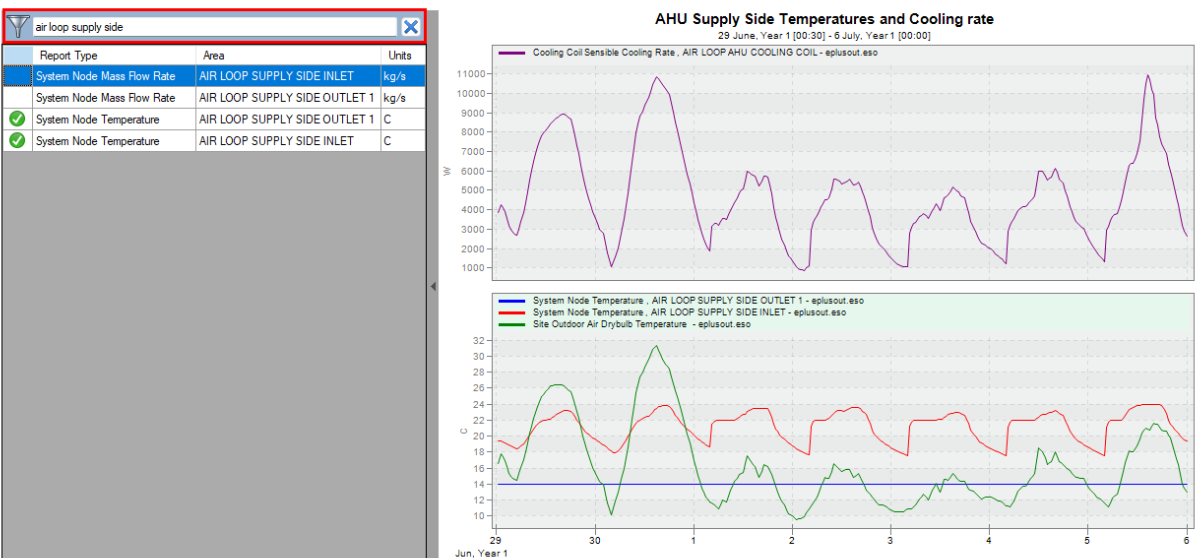
The DesignBuilder Results Viewer provides an extensive list of EnergyPlus-generated reports in grid format. Navigating that can be challenging in larger models, so our v4.2 release includes a new option to filter the reports to make it easier to find the relevant information.
To filter the displayed reports, click anywhere on the grid and press <Ctrl-F>. This displays the Filter text box at the top of the grid, allowing you to input specific filter text. Rows containing Report Type, Area or Schedule data matching the filter text will be displayed, while non-matching rows are hidden.
For example, if you need to view data for a particular zone, type its name in the Filter box. This will display only the reports related to that zone, along with any reports for connected HVAC or other associated components. Likewise, to view data related to a specific air or plant loop, type in the name of the loop.
For more information on using the filter feature in the latest Results Viewer, refer to the Program help.
Win a Complimentary Pass for SimBuild in Denver this May!
We are excited to announce a call for case studies, inviting DesignBuilder customers to share their experiences and showcase how they leveraged DesignBuilder to overcome obstacles, implement innovative solutions, and drive impactful outcomes in their projects.
And the best case study will win a free pass for *SimBuild in Denver from May 21st to 23rd! Even if you don’t win, your work could be featured in DesignBuilder’s newsletters, social media posts and website, providing you and your company with valuable exposure to tens of thousands of building performance modelling professionals.
More information on submission guidelines can be found here. Please email your completed case study to info@designbuilder.co.uk no later than 16th April.
Don’t miss this opportunity to share your project success! We look forward to receiving your submissions and celebrating your accomplishments.
Modelling Guidance for Various Project Stages
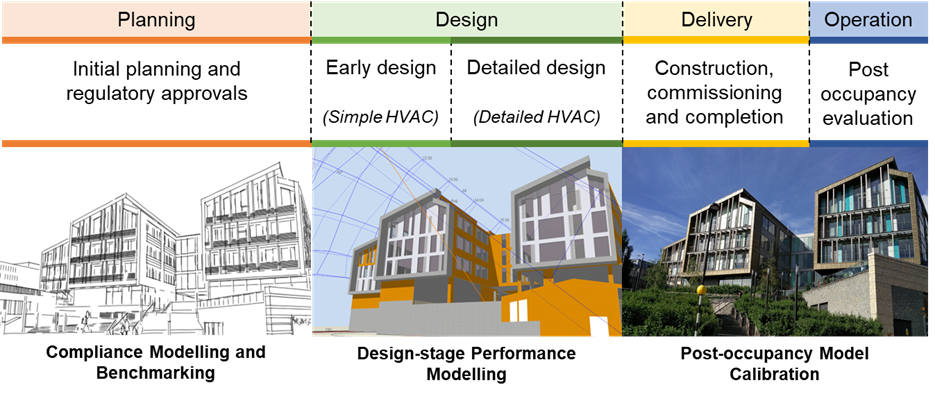
Accurate modelling is an essential component of best-practice sustainable building design and operation, particularly when working towards meeting low energy/carbon objectives. With DesignBuilder, you can update the model as your project evolves through the various stages. Starting with a compliance/regulatory model, you can develop this into early and detailed design stages and then use it post-completion in a calibration process for simulation-based post-occupancy evaluations. The typical modelling processes that apply at the various project stages can be summarised as:
- Initial project planning stage: Compliance modelling and setting benchmarks for energy and environmental performance.
- Design stage: Performance modelling using project-specific details based on modelling protocols such as ASHRAE Standard 209, CIBSE TM54, and NABERS Design for Performance.
- Post-occupancy stage: Calibrated models are used to help throw light on any underlying performance issues and operational inefficiencies as per CIBSE TM63, ASHRAE Guideline 14 and IPMVP.
For further insights into energy and environmental performance modelling through the various building project stages, including detailed guidance and case studies, check out our new article here.
Try it Out: Creating More Complex Geometry in DesignBuilder
DesignBuilder has various tools to help you model complex geometries. These include:
- Construction lines enable precise geometry to be created by allowing lines to be drawn at defined locations using snaps and the protractor tool. They provide a framework for projecting or attaching blocks.
- Outline blocks represent 3D shapes that do not include building elements like walls, roofs, or floors. Unlike conventional block types, they can intersect with other objects and are ideally suited for manipulation to help create complex shapes such as dormer roofs.
- The Boolean tool can be used to combine two connected block geometries or to merge or separate intersecting blocks.
- The Add Surface tool can be used to modify the topology of a block by drawing a perimeter on one of the block surfaces and then extruding it along an axis normal to the surface.
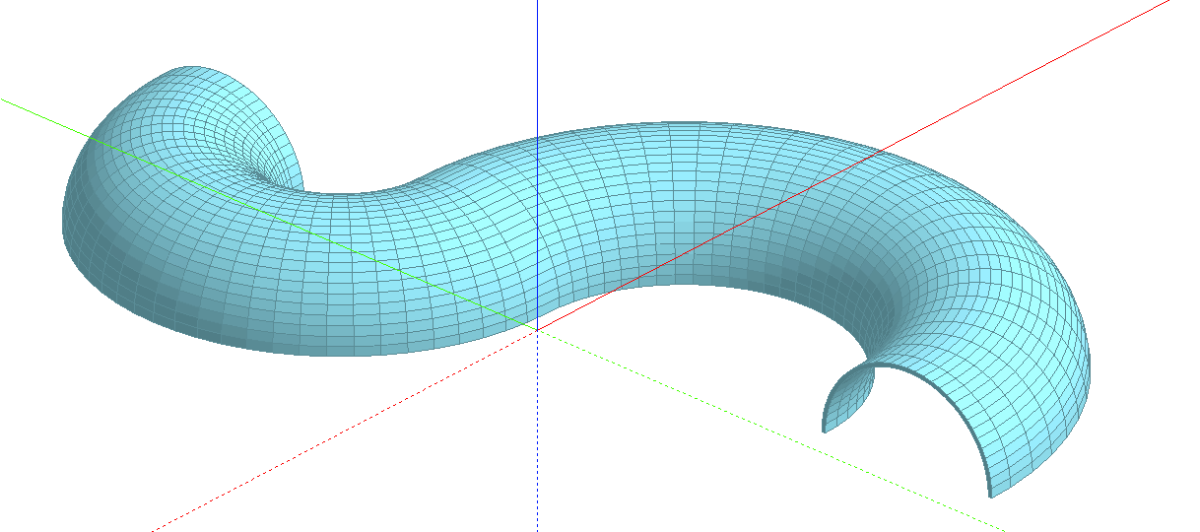
- The Follow Path tool is similar to Drag Face, but it allows more complex 3D forms to be created by drawing a block profile or section and extruding it along a predefined curved path. This process enables you to create curved block shapes or wrap-around shades, for example.
Click here to view a video that shows how to model a curved roof shade using several of the tools and techniques described above. Further step-by-step instructions and guidance on the Follow Path tool are provided in this help article.